THE GOLDEN MEAN AND MORE!
My experience with the HOMERS Tarantula RS printer
Introduction:
My wife wanted to make a robot, I offered kindly for her, that I print the parts. That's when the cold shower came. The printer hadn't I used in at least a year, and nothing worked the way it should have. After three days of suffering, the first modell was born. The printed object was as far from the as nice as here is the moon.
I decided I wouldn't suffer anymore and buy a new printer. Ignoring my wife’s clear instructions, I didn’t consider the $ 2 limit in my search. The goal is to find printer between $ 2-300 that I fall in love with. I wanted the golden mean or more. I first found the Clearity Ender 3 V2 printer. But that for $ 400 and it was as like as a black wooden cube... made of iron. I had to keep search. That's when I found it Homers Tarantula RS. Design, the world of colors are all matched. Graceful, powerful, and modern at the same time.
I immediately fell in love. I gritted my teeth and prayed that the electronics and mechanics of the printer would not be crappy. NO, IT WAS NOT THAT!!! Some of its parameters were more higher than its $ 400 rivals's. Only it was missing price, to make the dream come true, and YES $ 225 minus discounts. Then the inner voice spoke, Surely not a scam? But let it be, so So my wife won't bury either, miximum I can move. 😊
I pushed for the order and waited excitedly, the delivery just took a week and a half!
Wrapping:
The machine came in a rather large and heavy cardboard box. The weight of the machine is 8 kg, the weight of the package is 9.5 kilograms. Particular attention was paid to what the first impression should be when I pick up the package.
The parts are packaged in foam bed. Such a way that nothing can accidentally damage caouse anything in the another sparepart. (It is a good idea to check the foam carefully so that something is not hidden inside). Tiny parts bags are labeled in English, numbered, nowhere in a Chinese punctuation mark.
Fortunately, most of the electronics are already assembled in the pre-made enclosure, we only need to open them because of the cables to be taken out, because everything else is already plugged into the motherboard. The layout in the house is very arranged, even the use of cable markers is an attention was paid.
HERE NEED AN IMAGE!
All tools were included with the installation, and even beyond.


Assembling:
I think I’m blessed with a good dose of technical veins, and not just on a theoretical level, I fix everything that gets my hands on it. It was also surprising that it took me almost 3 days to get my old printer up and running.
Most of the parts are metal and only those parts are made of plastic that do not get a load. What I particularly liked was that one or two parts were redesigned just because of the design. It does matter because at best, it will be one of the “wedges” of our room, and no one likes having a pile of rubble on their table.
However, Homer Tarantula RS is a completely different world. I was surprised to find how realistic the assembly instructions were, easy to interpret, and didn’t seem complicated at first glance. Using the description on the SD card or following a good youtube video, you can conveniently assemble a printer in 2-3 hours. The illustrations and descriptions in this manual are clear and easy to follow.

By the end of the assembly, it became obvious that special attention had been paid to the fact that the assembly did not require any adjustments, or water levels. Attempts have been made to minimize the number of sticking out cables and which they could not hide, routed in cable stockings and connected to the electrical box with a solid metal plug. (Beautiful and demanding)
I would also like to note here that anyone Who doesn't like setting the tray should buy a BL Touch that will automatically perform this process for us.
You can find it here (Click on Picture):
If someone doesn’t like to search, I’ll share with you below the links where installation guides are available.
Assembly video: Youtube assembly video
The brave ones try to use this.😊
Assembly manual: Direct Link on Homers web site?


Software:
Because the firmware is pre-installed on the printer motherboard ,and SD card included the pre-written firmware itself (you only use it if you know what you're doing because it can easily be a warranty-free brick from your printer)
I use the Cura program.
- Because it manages and knows the settings of Tarantula Pro (Same as RS)
- Easy to use, user-friendly interface, and includes print setting.
- If the person does't know how to print then this an INSTALL and PRINT application.
Usually I set the layer thickness and ironing to the top layer, somtime I set support distance, but everything else fits the printer so much that it prints almost spotlessly even without any setting. Plus, so much people use this, so that almost everything about to Cura found on the net.
The Cura software can be downloaded from: Ultimaker Cura
Printing:
Since the firmware ther is on printer, the program plug & play, all you have to do is look for a couple of files to see what your printer can do.
There are a few that are worth running if we want to make sure our printer is well calibrated.
It is very important to make sure that these files are turned off and that the layer thickness is 0.1 or 0.15 need to be.
Calibration Cube

Click on the picture!
This is a simple calibration test cube for your 3D printer with X, Y Z written on the axis.
Benchy
Click on the picture!
The jolly 3D printing torture-test
Hard to print testfile

Click on the picture!
If often you don't know if your printer is ready for complex files. with this file you have an easy option to check problematic printing/slicing stuff.
Calibration Tower

Click on the picture!
Smart compact temperature calibration tower, to know how many degrees you print most beautifully.

Let's print:
THINGIVERSE is full of pre-made and already implemented printing ideas. Here you will find everything from a wooden spoon to a machine gun, literally everything.
Thingiverse link: THINGIVERSE
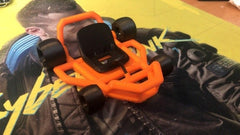
I printed to my daughter’s for a LEGO MARIO a car and the end result was excellent, the layer thickness was 0.15mm. I barely saw that it consisted of layers. I changed the PLA three times, but it was worth it. It must be assembled and can be used.
Click ont he Picture
Of course, a printer didn’t printer, until it passed the heavy load test, so I put in a 24 hour print for the second time. There is even a picture of this model. It’s unbelievable that she has become so beautiful.And with the help of the magnetic pad, it is so easy to remove the model that a 3-year-old can do it.


I'LL NOW TALK A FROM THE PRINTER!
The maximum printable modell size can be 240 x 240 x 260 millimeters, which means it is quite large, perhaps the largest in its category.
Of course, larger things can be printed, in which case the designers of the model make sure that the parts can be fitted together without falling into pieces.
The material emitted by the head is 0.4 millimeters thick, with a maximum print speed of 150 millimeters per second. I tested this, and the quality didn't got worse at this speed either.
Although if you want to operate the printer really quietly, you may want to drive the motors at 75 mm / s with half that. The printer is almost silent. I had to look at him several times at night, that this printer stopped? But no The Homers Tarantula RS really quiet.
Of course, you can get everything you will need for operation for the printer.PLA, ABS in several colors, a nozzle for the print head (there is a spare in the package), and usually all parts are available.
You can print from a computer, but even from a memory card, and the machine's display provides enough information for the latter. As an extra, it can also resume interrupted printing, so even in the event of a power failure, the semi-finished product does not go to the trash, the machine resumes where the work is interrupted.
What I also like is that there are plenty of accessories on the net for the printer. Well, they what we aren't need to buy, but ones that we can print out. There is, for example, a thread guide and a tool tray.
But there are also plenty of accessories available on the homers website that will make your machine even more professional, result in an even nicer model, or speed up your printing speed.

Click on the Picture
Let's also talk about the negatives, although even if there aren't many, there are one or two:
The motherboard cooling fan is quite loud, thanks to the fact that the MKS motherboard does not control the speed of this one fan. I temporarily eliminated this by plugging the fan into a 5 volt port so it runs silently but at lower power.

The other weakness of the machine is the touch screen, which looks very good and is very colorful but for a user who wants to change the printer settings a bit, there are few, I solved it with an old, but not with FULL GRAPHIC REPRAP controller, but for those who want more modernity, it can be a cheap option if you buy one. The printer has a slot on the motherboard and is also easy to set up in the firmware.

With that, I also ruled out the mistakes that bothered me.
Summary:
The Tarantula RS is an inexpensive and quality 3D printer that fully satisfies the needs of the user. The electronics are the print head, and the cables are orderlyand well hidden. It is easy to assembly, the parts fit snugly and precisely. The printer surface is sufficiently large. If the printer doesn't operating at maximum speed, you can sleep in a room with it because it isn't loud, and isn't flashing. In my opinion, anyone who buys this printer will be satisfied and will spend their time not on everyday adjustments, but on printing.
Future:
I'd like to try a few more updates later and share my thoughts with you.
NF-BMG-WIND V6 Dual Drive BMG Extruder
Homers/TEVO 3D Printers Kits New Upgrade Removal Spring
Steel Sheet
E3D Hotend upgrade Kit
Mosquito Clone All Metal NF-Crazy Hotend
Dragon Hotend V2.0 Super Precision 3D Printer Extrusion Head
I HOPE YOU LIKED THE DESCRIPTION AND YOU WERE ENCOURAGED TO TAKE SUCH A BEAST HOME!